Introduction
Integrated Strategies 3 - Mizuki and Caerula Arbor introduces a reworked version of the difficulty system, dividing it in fifteen different tiers instead of just three levels, each of which adds new modifiers to the entire run that range from minor inconveniences to absolute gamechangers, as well as bulking up every single enemy.
While the Surging Waves system allows you to crank up the difficulty up to 15, the last tier with any actual rewards is Surging Waves 7, providing both the highest score modifier and a unique trimmed medal for bragging rights. Compounded with the overall higher complexity of this season of Integrated Strategies, this is often considered to be on par with the Hard difficulty of Crimson Solitaire, if not harder.
By this difficulty tier, the following buffs are applied to the run all at once, cumulatively:
- Operators take +15% Elemental Damage
- Obtain a random negative collectible upon reaching Floor 3
- Enemy Resistance is increased by 10
- 3* and above Operators cost 1 more Hope to recruit, except Reserve Operators
- Boss Enemy Attack and Defense are increased by 15%
- Initial Light is reduced by 15
- Enemy Movement Speed is increased by 15%
- Enemy HP and Attack is increased by 7% for every Floor entered, multiplicatively.
This guide will cover how to make your attempts at clearing this difficulty tier much easier, recommending both meta Operators for the gamemode and suitable alternatives in case the player lacks them or does not get the tickets to recruit them. Without any further ado, let’s start!
Preparation
Getting ready is half the battle when it comes to this specific piece of content, and players will have an easier or harder time depending on how much they’re willing to prepare before attempting Surging Waves 7. This section covers the three things players can do to increase their chances of success before even starting the run, as well as what they actually need to do to even challenge this difficulty tier
The Surging Waves difficulty system is not all unlocked at the beginning of the mode, instead opening tier after tier when the previous one is cleared. This means that, before even attempting Surging Waves 7, players will have had to defeat all previous tiers from 0 through 6.
Players should use this slow climb to familiarize themselves with the new mechanics and nodes of the season, and most importantly checking out which maps they struggle with the most and would want to avoid in the future. This guide will contain a section on this specific topic further on.
Most importantly, players should become accustomed and comfortable with the stacking modifiers the previous Surging Waves add to their runs. Particularly important are Surging Waves 2’s forced cursed relic, Surging Waves 4’s recruitment cost increase, and Surging Waves 6’s initial Light decrease.
Also remade is the Preparation Behind Scenes feature of the previous season of the gamemode, where players could spend Caliginous Insights obtained in battle to grant themselves small buffs in their runs. The Cognitive Shaping feature is instead a much more in-depth upgrade tree that unlocks its nodes with Subjective Imagination.
The buffs from this system are significantly stronger than in the previous season, ranging from straightforward increases to Attack, Defense and HP, to the unlocking of entirely new exploration nodes and powerful boosts to starting squads.
Getting to Surging Waves 7 should give players enough Subjective Imagination to upgrade a significant portion of the tree, but not all of it. Thus, this guide recommends that players follow the middle branch of the tree towards the People-Oriented Squad buffs, which is the one it will use, unlocking along the way the Transactional Behavior, Resource Allocation and Curiosity nodes, and ending up with Habit, Common Sense and all the smaller nodes in this branch, such as Leadership Drive I-V, Multi-Pass Information Processing and Management Strategy.
For players who have any remaining Subjective Imagination, my next recommendation is following the leftmost branch from the origin node, unlocking Self-Preservation I-III, Appreciation of Life and Danger Awareness I-II. If there’s still even more leftover points for unlocking, my next best choice would be Introspection from the middle-left branch, but at this point any stat buff will be more than welcome too.
The final frontier of pre-run preparation is investing into Cannot Goodenough’s Prospective Investment System, where players can deposit Originium Ingots at random when in the Shop nodes in runs.
This process is rather slow and tedious and the Investment System interface is not guaranteed to spawn until the player has cleared all three Endings of the mode, but high enough investment will create new opportunities for players to purchase additional collectibles, unlock a new one and even allow players to rob Cannot blind once per run, though this is not recommended as he’s a rather powerful adversary.
Starting Out
The choices players make before and during the very start of a run will influence its outcome pretty heavily. This section will cover the initial choice of starting squad, as well as the most popular opener Operators for the early stages.
This season of Integrated Strategies provides a new set of starting squads that provide permanent buffs to players during their run. All the ones from the previous season return (with the class-oriented ones severely nerfed to no longer guarantee immediate Elite 2s), with the addition of three new ones exclusive to this season: Mind over Matter, People-Oriented and Resourceful.
The People-Oriented Squad is heavily recommended for any runs at Surging Waves 4 or higher. When fully buffed via Cognitive Shaping, this squad allows players to recruit all Operators without any increase in their Hope cost, which allows opening with a 6★ in the squad and for 3★ to not cost an ugly 1 Hope. It also makes promoting Operators 1 Hope cheaper, and allows the Safehouse node to be used twice per encounter, giving players a wide array of choice between additional free promotions, extra Life Points, more Hope, extra Squad Size, or even more Light or Dice Rolls.
If you are not willing to use People-Oriented, the next best choice is certainly Mind over Matter, which often provides extra relics at the end of combat encounters and allows players to pick two rewards from in-run missions, called Regional Commissions. Keep in mind this does not offset the Hope cost increase of Surging Waves 4, making 6★s cost 7 Hope and non-Reserve 3★s cost 1. It results in a much more difficult start.
An important aspect of clearing the final boss of Surging Waves 7 is actually being able to clear the first few floors. Different openers wildly vary in success rate even at this difficulty, and truly few Operators can claim to clear even the first floor with no leaks when we go even higher. Here’s a list of the most recommended openers for Surging Waves 7:
Tier 0
- Gavial the Invincible: Very strong, easy to use, can clear all of Floor 1 with ease (including Emergencies!) and scales well enough to still get use in further floors at this difficulty. If you do have her, there’s very little reason not to open with her.
Tier 1

- Ling: Overall all I’ve said of the previous Operator translates into this one as well. She has one of the better success rates against Floor 1 except specifically the Emergency version of Symbiosis. She scales nicely enough into further floors, but sometimes struggles due to her higher DP cost to deploy her first blockers.
Tier 2
- Horn: Horn struggles a bit more than the Operators in the previous tier due to her somewhat high deployment cost, and some of the earlier stages aren’t a perfect match either, but her second Skill can help hold the line easily even against larger waves of enemies. She also scales incredibly well, being a staple on later floors.
- Kroos the Keen Glint: May lack the straightforward firepower of the other Operators mentioned so far, but she is extremely consistent and provides players with strong consistent stunning options, which are almost mandatory in higher difficulties. Being a lower cost also means saving hope for future Operators as well.
- Highmore: Similarly to the other Operators in the higher tiers, Highmore has an easy time clearing the earlier stages thanks to her mode-specific buffs and decent enough self-sustain, though she struggles to stay relevant in deeper floors. Same as Kroos the Keen Glint, having a lower Hope cost starting out saves some for future tickets. Being the welfare Operator from this very event also makes her a very easy choice for players who might not have a well developed roster.
Tier 3
- Kal’tsit: Similarly to Horn, Kal’tsit is an easy solution for many early floor maps and provides easy ways to deal with hordes of enemies as well as a very unorthodox stun bomb if she’s ever promoted, but generally doesn’t scale as well into later floors.
- Mizuki: Weirdly enough, Mizuki’s consistent DPS provides good solutions for early maps that happen to favor him quite well. He also struggles scaling onwards as the support he provides lacks the ability to stun aerial enemies, which is rather important, but he does work to get past those first few pesky combat nodes.
Recruitment
This section will highlight the most powerful and priorityOperators to recruit during your exploration. Some Operators outside of these lists are still very much viable, but the ones here are a step above the rest thanks to their versatility, or how their specific abilities mix with the gimmicky stages and enemies of this gamemode
Hope is a very scarce resource in this season of Integrated Strategies, much more than in the previous one. Not only are the instant Elite 2 squads severely nerfed, but the stages from Floor 3 onwards are much more demanding as well, requiring specific answers for the challenges they put forward. These four Operators are incredibly versatile and have tools for every single stage in this mode, as well as being powerhouses of their own in terms of less gimmicky DPS or support tools.
Do keep in mind that none of these operators are “mandatory” to beat Surging Waves 7, and just the best options if you want to have a much easier time with the mode.
Texas the Omertosa
As we will see later in this section, Operators able to stun aerial enemies are paramount to getting through this gamemode. Skimming Sea Drifters are extremely tanky Elite enemies that are found all through Floor 3 onwards that deal a significant amount of damage and elemental damage. Their biggest strength, however, is also their biggest weakness: as these enemies have low-altitude hovering, they cannot be blocked or targeted by melee Operators, but they can permanently be knocked down and stripped of their ranged attacks with hard Crowd Control effects, such as Sleep, Freeze and Stun. Due to this, these enemies will most often path over holes in the terrain and will not repath if knocked down, letting Operators with consistent aerial Stun effects solve this large issue very quickly. The exact same thing applies to the final boss of Ending 1 as well! Other than this important aspect of this mode, Texas the Omertosa is also able to deal insane amounts of damage on a fast redeploy kit, making her particularly strong in every single map out there.
Horn
Horn’s massive range is a very powerful tool that gives her both insane versatility and unmatched safety. Be it consistent damage with massive AoE for normal stages with her Flare Grenade or burst DPS for elites or bosses with her Ultimate Line of Defense, Horn has it all and puts in a lot of work even at Elite 1, right out of a recruit. She also faces little to no competition within her own class, making her a very straightforward choice for Defender tickets. Finally, she is by far one of the best Operators for the boss of Ending 1, as she can ignore one of its most bothersome mechanics and outrange it.
Młynar
Pure, raw, multi-target, air-hitting damage on a wide area. Młynar is not the most straightforward Operator in the game due to his archetype, but his usage is rather simple. Do you want something dead? If so, press this funny button. Still, he does come with a couple of downsides that you have to be aware of lest they catch you off-guard and ruin your run. First, remember that his increased taunt can be as much of a blessing as it can be a curse, particularly when encountering Retching Broodmothers in large quantities, which will pelt him to death fairly quickly by continuously targeting him. Secondly, compared to Operators like Gavial the Invincible and Horn, he struggles to get going before he is promoted to Elite 2.
Pozëmka
Pozëmka is able to squeeze into the very top tiers of this mode thanks to her invaluable versatility and burst damage. Only Texas the Omertosa can really do anything similar to what her Typewriter does, delivering massive bursts of damage to enemies anywhere on the map, and even outranging the annoying aura effect of the boss of Ending 1, which we will discuss later on. As with Młynar, she also struggles to perform well before she’s promoted to Elite 2.
As previously mentioned, having Operators capable of delivering quick and constant stuns to airborne enemies is paramount in this mode when the difficulty level starts going up, particularly against the aforementioned Skimming Sea Drifters and the final boss of Ending 1. Essentially, if you are unable to draft Texas the Omertosa at Elite 2, make sure you have at least one of these.
Most Commonly Used
Capable of delivering consistent (and often quick) stuns at long range, keeping themselves safe.
Good Enough
More close-range options that need to be in the battlefront to appropriately deliver their stuns, or that have some random element or worse cycling to their stunning capabilities.
Viable if no other option
Avoid using unless absolutely necessary. Can deliver those hard Crowd Control effects, but are too involved or too RNG gated to work properly most of the time.
It is often recommended not to waste one’s hope in 5 and 4★, given the massive power differential between those and the powerful carry 6★s. You don’t want to spend 3 Hope on a 5★ and then realize you will be just one short of drafting Horn or Młynar, so most of the time lower-rarity Operators are considered luxuries for when you have more hope than you know what to do with, with a couple of exceptions.
Apart from the aforementioned stunbots, the following lower-rarity Operators are still worth drafting if you will be left with enough hope to draft a 6★ next battle:
Ptilopsis
The healing load on this gamemode is not too terrible, mainly because the actually dangerous enemies can easily get through most of it via stacking elemental damage or hits powerful enough to instantly down any Operator. Ptilopsis provides a great compromise between strong healing and support that’s hard to pass up on if you have the Hope for it, given how “dead” Medic tickets tend to be, apart from Kal’tsit.
Shamare
Shamare’s great here for the same reason she’s great everywhere else - strong, versatile debuffs for both offense and defense that can be delivered anywhere on the battlefield thanks to her doll. The primary damage type in Mizuki and Caerula Arbor tends to be Physical, so the Defense shred is very much welcome.
Cantabile
Cantabile brings to the table a very powerful form of DP generation with a semblance of offensive presence. Her redeploy capabilities let her take support multiple locations at once, even downing certain enemies such as Ocean Stonecutters if she gets to fire off all her attacks before dying. The invisibility provided by her second Skill is also great, considering how many enemies have incredibly powerful ranged attacks that could kill her in a couple of hits. She also has great interactions with a very large amount of relics, benefitting from anything that provides initial SP, Attack Speed, or quicker Redeploys. For me, by far the best choice for a non-3★ Vanguard.
Elysium and Myrtle
Similarly to Cantabile, both of these Flagbearer Vanguards can still fill the role of DP generation very nicely, even if they fail at providing much else. I would not have them as my first Vanguard picks, but they can undeniably still put in a significant amount of work.
Highmore
Finally, Highmore is not a terrible choice for Guard tickets, but she struggles to be seen often amongst the other powerhouses in it, mainly Młynar but to a lesser extent also Gavial the Invincible. She is nowhere near bad and definitely worth grabbing in certain scenarios, but those scenarios are significantly rarer than for many of the other Operators in this category.
Exploration
This section will discuss specific mechanics, strategies and specific nodes (both combat and event) so players know what they're getting into, what to avoid, and what to look out for and prioritize during the explorations.
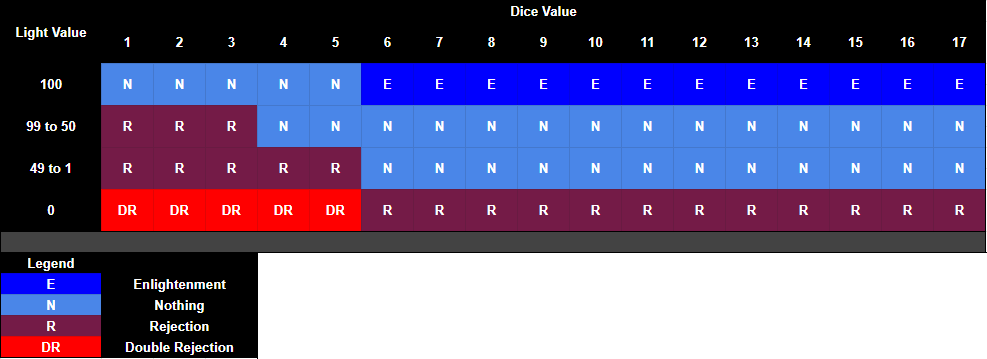
Light is a new mechanic introduced in Mizuki and Caerula Arbor that shapes entire runs through its effects. Regular runs start at 100 Light, the maximum, and slowly lose some when the player takes Objective HP damage (not shields!) or completes any fight while below 50% of their Max Objective HP. A multitude of events and relics can also lower the Light level, while increasing it back up is rather rare.
Players should avoid losing Light at all costs, as dipping below certain thresholds can be very dangerous. Surging Waves 6 reduces the initial light level of a run from 100 to 85 enabling the possibility of dangerous debuffs. Low light affects the likelihood of obtaining Rejections (as explained in the following section) and Calls of We Many, the equivalent to Hallucinations from the previous season.
One of the new mechanics for this season of Integrated Strategies is the addition of Rejections, dangerous debuffs that affect specific Operators within your team and mainly occur when the player enters a new floor at low Light.
Each time the players swaps to a new floor, a Dice will get rolled. Depending on your Light value and the specific roll of the Dice, players might get an Enlightenment, Nothing Rejection, or Double Rejection. This encourages players to keep their Light as high as possible.
Only one Rejection type will be chosen per run, and all Operators affected will have the exact same debuff. In order to mitigate the effects that Rejections can have on the party, it is important that players keep their Light as high as possible (ideally above 50 at all times, though 100 is ideal) and recruit as many Operators as they can. Since the Operator the Rejection lands on is completely random, having a large number of them lowers the chances of your main carries getting hit by it.The four rejection types are as follows:
- Hematopoietic Inhibition - Afflicted Operators under Max HP will take 150 True damage per second (can’t fall under 1).
- Cognitive Dissonance - Afflicted Operators will use their Skill automatically as soon as it’s available and viable to activate.
- Neurodegeneration - Afflicted Operators will be Frozen for 15 seconds on deployment.
- Metastatic Aberration - Afflicted Operators will have their HP, Attack, Defense, DP cost and Redeployment Time halved.
Floor 1
- Symbiosis: Not incredibly hard with some starters, but can force a couple leaks in Emergency mode with some popular others, such as Ling.
Floor 3
- Sanguinarch’s Legacy: Spams a very large amount of Chapter 10 enemies and necessitates two melee blockers to cover the exits. Spawns a Sarkaz Heirbearer Retrofit ASV halfway through the stage that can cause major problems via the buffs it provides to the other enemies.
Floor 4
- Nethersea Brand Land: Pre-fills the entire map with Nethersea Brand, continuously causing damage and elemental damage to all melee Operators. Also spawns Pocket Crawlers, Nethersea Predators and Nourished Reapers, none of which are easy to deal with.
- Territorial Tendencies: Pre-spawns 8 Acid Originium Slug α that cover the entire map. Constantly spawns Infused Originium Slugs, Infused Originium Slugs α, Bombtails, Bombail-Gs and Pompeii as a boss enemy, which can practically hit the entire map given it’s really small. Avoid at all costs unless you have a really strong team.
Floor 5
- Out of Control: Constantly spawns Enraged Possessed Bonethrowers and Enraged Possessed Leaders all across the map, leaving barely 5 tiles of viable deploy space where the former cannot target directly from spawn. Extremely oppressive even with all the most powerful Operators in the squad and has two lanes to defend. Absolutely avoid at all costs.
- Ubi Bona Somnia: Pre-spawns 9 to 10 Nourished Reapers in the middle of the map, along with an Originiutant α that slowly opens a second lane for enemies to go through. Extremely oppressive due to the lack of positions that don’t awaken the Reapers too early. Avoid at all costs.
Compared to the second season of Integrated Strategies, Mizuki and Caerula Arbor has a significantly higher number of unique nodes and events. This section will cover some of the most important ones.
Tulip’s Commission
When encountering this node, players will be prompted to choose one of three different side objectives to accomplish through the run, each with varying levels of difficulty. Completing these will grant a choice of rewards depending on the difficulty of the commission, ranging from small amounts of different resources to very rare collectibles and recruitment opportunities. It is generally always worth going for this node if you find it early enough in your run, as that gives you the highest amount of time to complete the objective. Choose carefully, though, as certain contracts of the highest difficulty can directly impact combat operations.
Wish Fulfilled
At the end of the second floor and dispersed through the map players may find these nodes. Upon entering, players will be given a choice between two random collectibles, one of which they can obtain by rolling a dice and landing on a result of 2 or higher (this neither requires nor consumes Dice Rolls). If the result is 1, a random collectible will be awarded instead, and if the result is 6 or higher the player will receive an additional random collectible on top of the one they chose. This node is generally a very good objective as it grants a free relic and gives the player some agency in the matter.
Fortuitous Opportunity
Upon entering this node, players will be prompted between obtaining 4 Max HP or trading a relic in their possession for a choice of two, similarly to the Wish Fulfilled node but without the need to roll a dice. This is an extremely high prioritynode to take from Surging Waves 2 onwards, as players will be given a random cursed collectible with a negative effect immediately upon entering Floor 3. This node allows players to exchange this collectible away and, in all but one case, completely remove its negative effect for the rest of the run.
Emergency Dispatch
In this node players will be given the option between obtaining 3 Hope or sending an Operator away on a dispatch mission. The selected Operator will be unavailable for the remainder of the floor, but when advancing to the next floor they will be back with some ingots as rewards and, most importantly, a Promotion and their Rejection cleansed if they had any. The priority of this node varies in regards to where exactly you encounter it. Depending on your luck, you might get it just before the final node in a floor without a boss at the end, or you might get it at the very start of Floor 3. Always remember that the chosen Operator will be unavailable for the entirety of the floor before you send them away.
Safe House
Entering this node gives players 4 different options to choose from, picked at random between gaining 3 Max HP, gaining 3 Hope, gaining 2 Dice Rolls, gaining 15 Light, +1 Squad Size Limit or a Promotion voucher. If players are using the People-Oriented Squad and have the upgrade Habit unlocked, the Safe House will be able to be utilized again, rerolling the four options. This node is very, very high priority if you are running the aforementioned squad (which you should), and generally really good even if you aren’t. Prioritize Light if you’re about to dip under 50 or to rise to 100, followed by Promotions if possible, then Hope and Squad Size Limit as needed.
Wander into Wonderland
Upon encountering this node, players will be prompted to either obtain a random collectible or spend a key to trigger a special event. If the event is triggered, the player will be immediately transported to the start of a secret floor with four nodes: one Wish Fulfilled, two Combat Operations and one Dreadful Foe. The Combat nodes are chosen at random between the pool of stages for Floor 5 and 6, making them quite dangerous, and the Dreadful Foe will be one of the three final bosses for the first season of Integrated Strategies, Ceobe’s Fungimist: Rusthammer Warrior, Frozen Monstrosity or Gravestone. A Call of We Many will be in effect all throughout the floor, regardless of the Light level upon entering it, and on clearing it the player will be transported back to the Wander into Wonderland node they entered from. Players should avoid spending the key unless they are very well prepared; while the rewards are undeniably good, the Combat nodes (which can be emergencies) and boss are also very difficult and likely to end your run. Always remember that the combat nodes are taken from Floor 5 and 6, making them incredibly tough even if you are on pace.
The easiest final boss for this season of Integrated Strategies is the first one, Paranoia Illusion. Her fight is rather simple if you have certain Operators, but even if you don’t it’s still significantly easier than any of the other two endings.
This stage contains a singular Protection Objective to defend but three different lanes where enemies spawn. The left one constantly spawns Retching Broodmothers and Ocean Stonecutters, the right one spawns Skimming Sea Drifters and Ocean Stonecutters, and the middle one spawns Bone Sea Drifters and Paranoia Illusion herself. Victory in this stage boils down to being able to handle both side lanes quickly before they get out of hand while taking care of the boss so it doesn’t pick off your Operators.
The boss itself takes a long while to spawn, so players should spend the beginning of this stage gathering DP while chipping away at the Bone Sea Drifters that spawn up top and start walking in circles for a long while. Players should also start setting up some sort of melee operator to cover the left lane with a medic, while also preparing their stunbot to deal with the Skimming Sea Drifters on the right. Since the enemies that spawn on the right side aren’t particularly dangerous, using redeploys to deal with the few Stonecutters that will leak through is recommended, which will ease the pressure elsewhere. If you have Cliffheart in your squad she can very safely pull both types of enemies into the holes whenever they spawn, while Texas the Omertosa will be able to constantly redeploy on them.
As for the middle lane, the main threat is Paranoia Illusion herself, though she isn’t particularly tough if you know what you’re doing. When spawning and upon switching to her second phase she will start hovering midair, becoming unblockable and immune to melee damage. This can be very quickly solved by using your stunner on her, knocking her down permanently.
The Paranoia Illusion will constantly attack up to 3 Operators while inflicting elemental damage, but if there aren’t enough Operators within range she is able to focus the remaining attacks onto the same Operator multiple times. This is survivable on lower difficulties if there’s a medic nearby, but be careful with the elemental damage as it stacks up. Also be aware that Operators within her range will have their Attack Speed severely reduced.
Upon falling to 0 HP, Paranoia Illusion will slowly recover back to full health over 20 seconds, and then enter her second phase. Upon entering this phase, she will regain the Hover effect until knocked back down again, her target count will increase to 5 (retaining the ability to target the same Operator multiple times), her attack radius will increase significantly and the Attack Speed debuff will become even worse, easily crippling Operators defending the side lanes.
The easiest way to deal with Paranoia Illusion is to completely outrange her, ignoring both the heavy damage she inflicts and the very bothersome Attack Speed debuff. In this regard, there’s no Operator that can hold a candle to Horn. Placed right under the Protection Objective and with the aid of any stunner to bring the boss down, Horn will be able to use her third Skill to pummel it over and over, easily one-cycling both phases in lower difficulties while also taking care of every single Bone Sea Drifter. If you don’t have Horn, other Operators with long attack ranges (4 to 5 tiles) can also take care of it without suffering from the troublesome debuffs. Placed on the left side, Pozëmka’s Typewriter can also outrange the boss if she’s on the furthest tile it can reach.
Once Paranoia Illusion is dead, the rest of the stage is quite simple in comparison to the average Floor 5 stage, so you can focus most of your firepower on dealing with the Retching Broodmothers of the left lane while your stunner takes care of the right and any other Operator deals with the remaining Bone Sea Drifter, as they are rather weak and don’t start advancing quickly enough to pose a threat.
Conclusion
That's it for this guide! I hope that after this massive wall of information you will be able to more easily accomplish that Surging Waves 7, but if you can't, don't get discouraged! This is easily the hardest piece of content with any sort of reward currently available (bar the bragging rights of Surging Waves 15, of course), and a lot of it hinges on a major RNG element that can be felt through every single run of this mode.
Best of luck, Doctors!


